You have finished choosing your ideal trim style, you made the purchase and it is now installed. If you want to make wood trim look modern, or if you are looking for the finishing touches to your wood trim, it is time to paint your trim! The last step to completing your wood trim in your home is to paint it. Whether you are staining the trim, painting it white, or choosing a unique colour, this step is one of the most important steps you can make. If you are still in the stage of choosing your trim style, check out our blog “Trim Options are Endless, but What’s the Style for you? Traditional or Modern?” If you have chosen your trim style but looking for something to enhance the appearance, you will learn a lot from our blog “Additional Trim Products to Enhance your Standard Trim in your Home.” Now let’s get into painting your wood trim!
Do it Yourself
Painting trim can be tedious, or something you don’t completely enjoy doing on your days off of work. While you can hire painters to paint your wood trim, you can also see this as a easy DIY project. Painting your own wood trim is something you can do yourself, it is a DIY project that anyone can do. At Riverside, we work with builders, contractors and homeowners, so some of our customers hire professional painters, although we do have some customers who are DIY masters and love to complete little projects like this themselves. If you have the dedication to take on this ‘do it yourself’ project, continue reading this blog to find out some great tips for painting your own trim.
Sanding
Before you paint your trim, you want to make sure that your wood trim is smooth. If you purchased trim that is not primed and a wood material, like poplar or oak, you can start with sanding it, if it is necessary. Having smooth wood trim will allow the paint to settle better, look better and dry better. If you find your Poplar baseboard or trim is pretty smooth to begin with, which is the goal, that is great! If you purchased new trim from one of our local showrooms (Waterloo, London, Stoney Creek), you likely will not need to sand any pieces, so you would be able to skip this step.
If you are painting your already existing trim to touch it up a bit we suggest you give it a once-over with 120-grit sandpaper that you can purchase at your local hardware store. Although you may get some pieces that are a bit more rough, in this case you would likely want to use a 80-grit sandpaper.
Let’s say your existing trim is pretty rough and covered in dents, markings, or was unfortunately ruined by one of your pets. The thought of repainting all of your old trim seems like too much work with all of the sanding you would have to do. You may be wondering how to repair wood trim chewed by your dog, well the best way to fix the issue is by purchasing new trim, although if this is not an option for you, you can start with sanding the trim.
Fill Imperfections
Once you have installed the trim, or once the trim is installed by your trimmer, and before your paint, you will need to fill any holes. You can purchase wood filler at your local hardware store and using a flexible putty knife you can fill the holes or dents. To fill some smaller imperfections, you can use spackling compound. These holes would be from nails from the installation process.
How to Caulk Trim
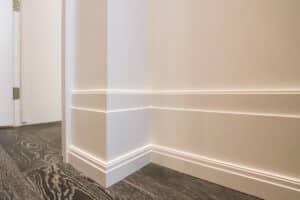
Caulking your trim is an important step to painting your baseboard or casing. Caulking helps complete a finished look and helps the paint last longer. Caulk the baseboard where the top of the baseboard meets the wall, filling in any cracks or gaps. Once the joints and cracks are filled, caulk the rest of the trim. Once you are finished caulking, you can smooth out the caulk with a finger or putty knife. You can also smooth out the caulking as you go, or go back and smooth it out after you complete one section, wall or room.
If you are wondering how long it takes for caulking to dry, you are not alone! This all depends on the type of caulking you purchase from your local hardware store. The environment and thickness of how you applied it also matters. While most caulking takes about an hour to dry, it can take up to 24 hours for the calking to cure completely.
Paint Your Trim
You may have been wondering, when to paint trim, the time is now. After you have filled in all of the holes, you are ready to paint your trim. The first thing you need to consider is the type or trim and if it is primed or not. Riverside provides some trim profiles primed already, while others, depending on the material, will not come primed. If your trim is not already primed, you will need to purchase paint primer before you paint the trim your desired colour. First, you can paint the trim with the primer you have and let it dry for the period of time stated on the primer can. Another question you may have asked yourself is, what colour will you paint your trim? While white is the most common trim colour there is, we have seen many different colours of trim.
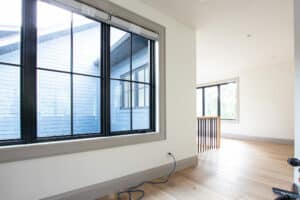
In the image below you can see a pewter colour trim against an off white wall. The pewter truly stands out and creates unique contrast when comparing the interior wall colour and the black windows.
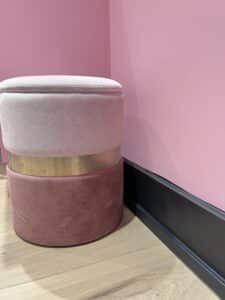
Below is an image of black baseboard against a pink wall. Black trim has become very popular within the past few years and is becoming more common as an accent throughout homes or buildings. You may think that black as trim would be a colour that stood out, in a bad way, although if you use it with the right colours, it creates such a unique impact on your space. Check out our blog “Ways to Include Black Accents in your Home” to see some great suggestions and inspiration on black accents in a home or building.
When painting the trim, you can use a standard brush, purchased from a hardware store, to use for painting your trim. It is suggested to use a brush and not a roller so that you can get to the edges of the trim without painting the floor or wall accidentally.
If painting a steady line is not your strongest skill, we would recommend applying painters tape to the floors or walls to protect them from being painted while you’re applying the trim paint.
Using your dominant hand, take the paint brush, dip it in the paint colour of choice, remove any excess paint and slowly graze the paint brush over your trim. Depending on the quality of primer or paint you decide to purchase, you may need to do more than one coat.
We hope this blog helped you feel more confident about painting your wood trim. If you have any questions, ask your Riverside Sales Representative for more information.
Check out our blog, Additional Trim Products to Enhance your Standard Trim in your Home.